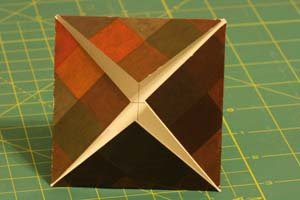
I promised months ago to post a tutorial on how to recycle greeting cards into tiny boxes, and finally managed to photograph one tonight while I was making it.
Before we get started, I have a couple of tips for box-making success. First, try to use a ruler that measures in sixteenths of an inch. You'll be able to measure more accurately. I don't have one, but I've made enough of these that I can estimate 1/16" fairly easily. Second, look for greeting cards that have a matte finish. For the box pictured here, I used a card with a glossy finish, and you can see cracks in the surface where I made the creases. A matte finish is less likely to do this, and will result in sharper edges and less cracking.

OK, first select a card and determine the largest size square you can cut from the front. You can go smaller than that if you like, but for your first box it's easiest to work as large as possible.

Next, on the reverse of your card front, draw your square, then place your ruler from corner to corner and draw an X in the center. This will mark the exact center of the square. On the back of the card (the blank area or the space where the greeting is), draw a square that is 3/16" smaller than your previous square. Mark the center.
 Cut out the squares with scissors or a rotary cutter.
 Beginning with the square you cut for the box top, fold all four corners to the center X and crease the folds.
 Fold each straight edge toward the center, crease, and unfold.
 Note the crease lines in the photo at left. It's important to complete all the folding steps above so that you make the correct cuts in the following step.
 Using sharp scissors, cut from point A to point B. You'll be cutting through 2 layers of cardstock. Then cut from point C to point D. Repeat these cuts on the OPPOSITE edge of your folded card. IMPORTANT: You're only cutting on 2 sides, NOT 4.
 Fold out the 2 sides you cut, as pictured at left.
 Fold up sides 1 and 2 so that they're vertical.
Fold sides 3 and 4 over to hold sides 1 and 2 in place. If the little pointed sides don't stay down by themselves, glue them in place.
Repeat all steps for the box bottom. The top and bottom may fit very tightly together, depending on how carefully you cut and measured, or on your folding technique. Take this into account for your next box, and cut the box bottom smaller or larger accordingly. Be warned, these are addictive!


4 comments:
what a nice idea!
arlene,
West Bremerton florist
such a great idea! I linked to your post in my papercraft blog, okay? thanks! blog carnival issue 4
It is really a great idea !
Rini -the Netherlands
Thanks, everyone. These are very simple to make, and once you've done a few, you'll be finding all kinds of uses for them. They're also cute when wrapped with a tiny ribbon or metallic elastic cord, and make sweet little tree ornaments.
Post a Comment